
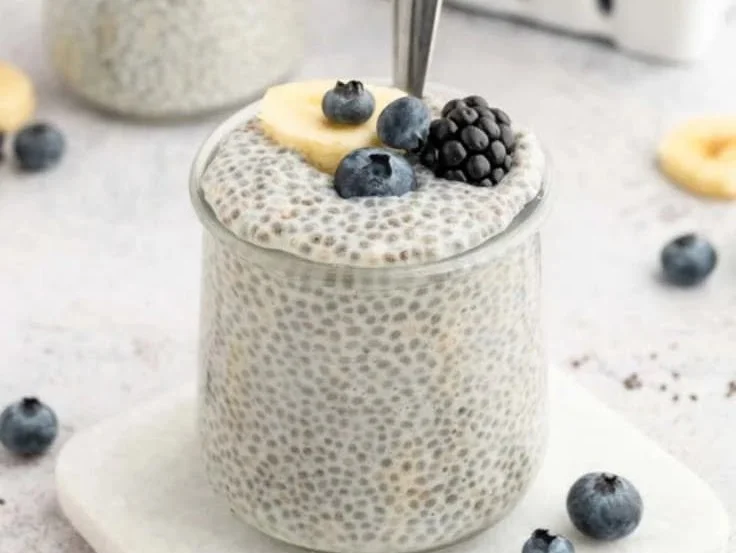
Creamy Vanilla Chia Pudding is a delightful, healthy treat that is perfect for breakfast or dessert. It’s simple to make, packs a nutritional punch, and can be customized to suit your taste. Here’s why you’ll want to whip up this creamy goodness.
Why make this recipe
Chia pudding is not only delicious but also incredibly nutritious. Chia seeds are rich in omega-3 fatty acids, fiber, and protein, making this pudding a wholesome choice. Its creamy texture and sweet vanilla flavor are comforting, and it can be tailored with various toppings like fruits or nuts to enhance the experience. Plus, it requires very little hands-on time!
Ingredients
- Chia seeds
- Vanilla extract
- Milk (dairy or non-dairy)
- Sweetener (honey, maple syrup, or sugar)
How to make it
- In a bowl, combine the chia seeds, milk, vanilla extract, and sweetener.
- Stir well to ensure there are no clumps.
- Let the mixture sit for about 5 minutes, then stir again.
- Refrigerate for at least 1 hour or overnight to thicken.
- Serve chilled, topped with your choice of fruits or nuts.
How to serve it
Serve your creamy vanilla chia pudding chilled in a bowl or jar. Feel free to get creative with toppings! Fresh fruits like berries, banana slices, or mango work wonderfully. You can also add nuts, seeds, or even a drizzle of extra honey or maple syrup for added sweetness.
How to store it
Store leftover chia pudding in an airtight container in the refrigerator. It will keep well for up to 4 days. Just give it a good stir before serving, as it might thicken further when chilled.
Helpful tips
- For the best texture, use a whisk to mix the ingredients thoroughly. This helps prevent clumping of chia seeds.
- If you prefer a sweeter pudding, adjust the sweetener to your liking after the initial mixing.
- The longer you let the pudding sit in the fridge, the thicker it will become, so overnight is ideal.
Optional variations
- Chocolate Chia Pudding: Add cocoa powder for a chocolate twist.
- Coconut Chia Pudding: Substitute half of the milk with coconut milk for a tropical flavor.
- Spiced Chia Pudding: Sprinkle in some cinnamon or nutmeg for added warmth and flavor.
Frequently asked questions
Can I use flavored milk?
Yes, using flavored milk, like almond milk or coconut milk, can enhance the taste. Just be sure to adjust the sweetener accordingly.
Is it necessary to refrigerate the chia pudding?
Yes, refrigerating it helps the chia seeds expand and thicken the pudding. It’s best enjoyed after it has set in the fridge.
Can I use different sweeteners?
Absolutely! Honey, maple syrup, or sugar can all be used as sweeteners. Choose the one that fits your taste preference or dietary needs.
Creamy Vanilla Chia Pudding
A delightful, healthy treat perfect for breakfast or dessert, packed with nutritional benefits.
- Prep Time: 5 minutes
- Cook Time: 60 minutes
- Total Time: 65 minutes
- Yield: 4 servings 1x
- Category: Dessert
- Method: Chilling
- Cuisine: Healthy
- Diet: Vegan
Ingredients
- 1/4 cup Chia seeds
- 1 teaspoon Vanilla extract
- 2 cups Milk (dairy or non-dairy)
- 2 tablespoons Sweetener (honey, maple syrup, or sugar)
Instructions
- In a bowl, combine the chia seeds, milk, vanilla extract, and sweetener.
- Stir well to ensure there are no clumps.
- Let the mixture sit for about 5 minutes, then stir again.
- Refrigerate for at least 1 hour or overnight to thicken.
- Serve chilled, topped with your choice of fruits or nuts.
Notes
For best texture, use a whisk to mix thoroughly. Adjust sweetener to taste.
Nutrition
- Serving Size: 1 serving
- Calories: 220
- Sugar: 7g
- Sodium: 60mg
- Fat: 9g
- Saturated Fat: 1g
- Unsaturated Fat: 8g
- Trans Fat: 0g
- Carbohydrates: 30g
- Fiber: 10g
- Protein: 7g
- Cholesterol: 0mg